> ## Documentation Index
> Fetch the complete documentation index at: https://dpos.xdr.ooo/llms.txt
> Use this file to discover all available pages before exploring further.
# 2. Ubuntu 24.04 Server Installation
> Install the Ubuntu 24.04 Mirror Server with enough disk space, SSH access, and a usable root filesystem.
# 2. Ubuntu 24.04 Server Installation
Use this page when you are building a new Mirror Server. If Ubuntu 24.04 is already installed and validated, continue to **Mirror Server Setup**.
## What you are building
Use a clean **Ubuntu 24.04 LTS amd64** server. The current validated minimum/baseline is:
| Resource | Requirement |
| ------------------ | --------------------------------------------- |
| CPU | 2 vCPU minimum; 4 vCPU recommended |
| Memory | 4 GB minimum; 8 GB recommended |
| Disk | **100 GB total** for the current artifact set |
| Network | Stable IPv4 reachable by every target DP |
| DP → Mirror Server | TCP 80 |
| Administration | SSH access recommended |
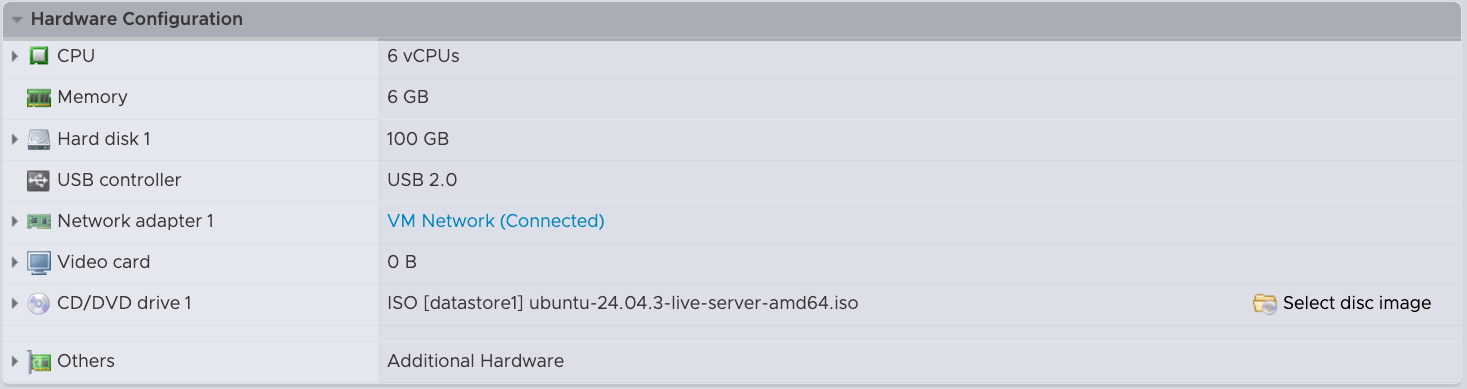
The screenshots below use a 100 GB VM with 6 vCPU and 6 GB RAM. Those values are an example, not a replacement for the current requirements above.
## Step 1 — Create the VM and attach Ubuntu 24.04 ISO
Create the VM, attach an Ubuntu 24.04 Server ISO, and make sure the disk is at least 100 GB.
 ## Step 2 — Start the Ubuntu Server installer
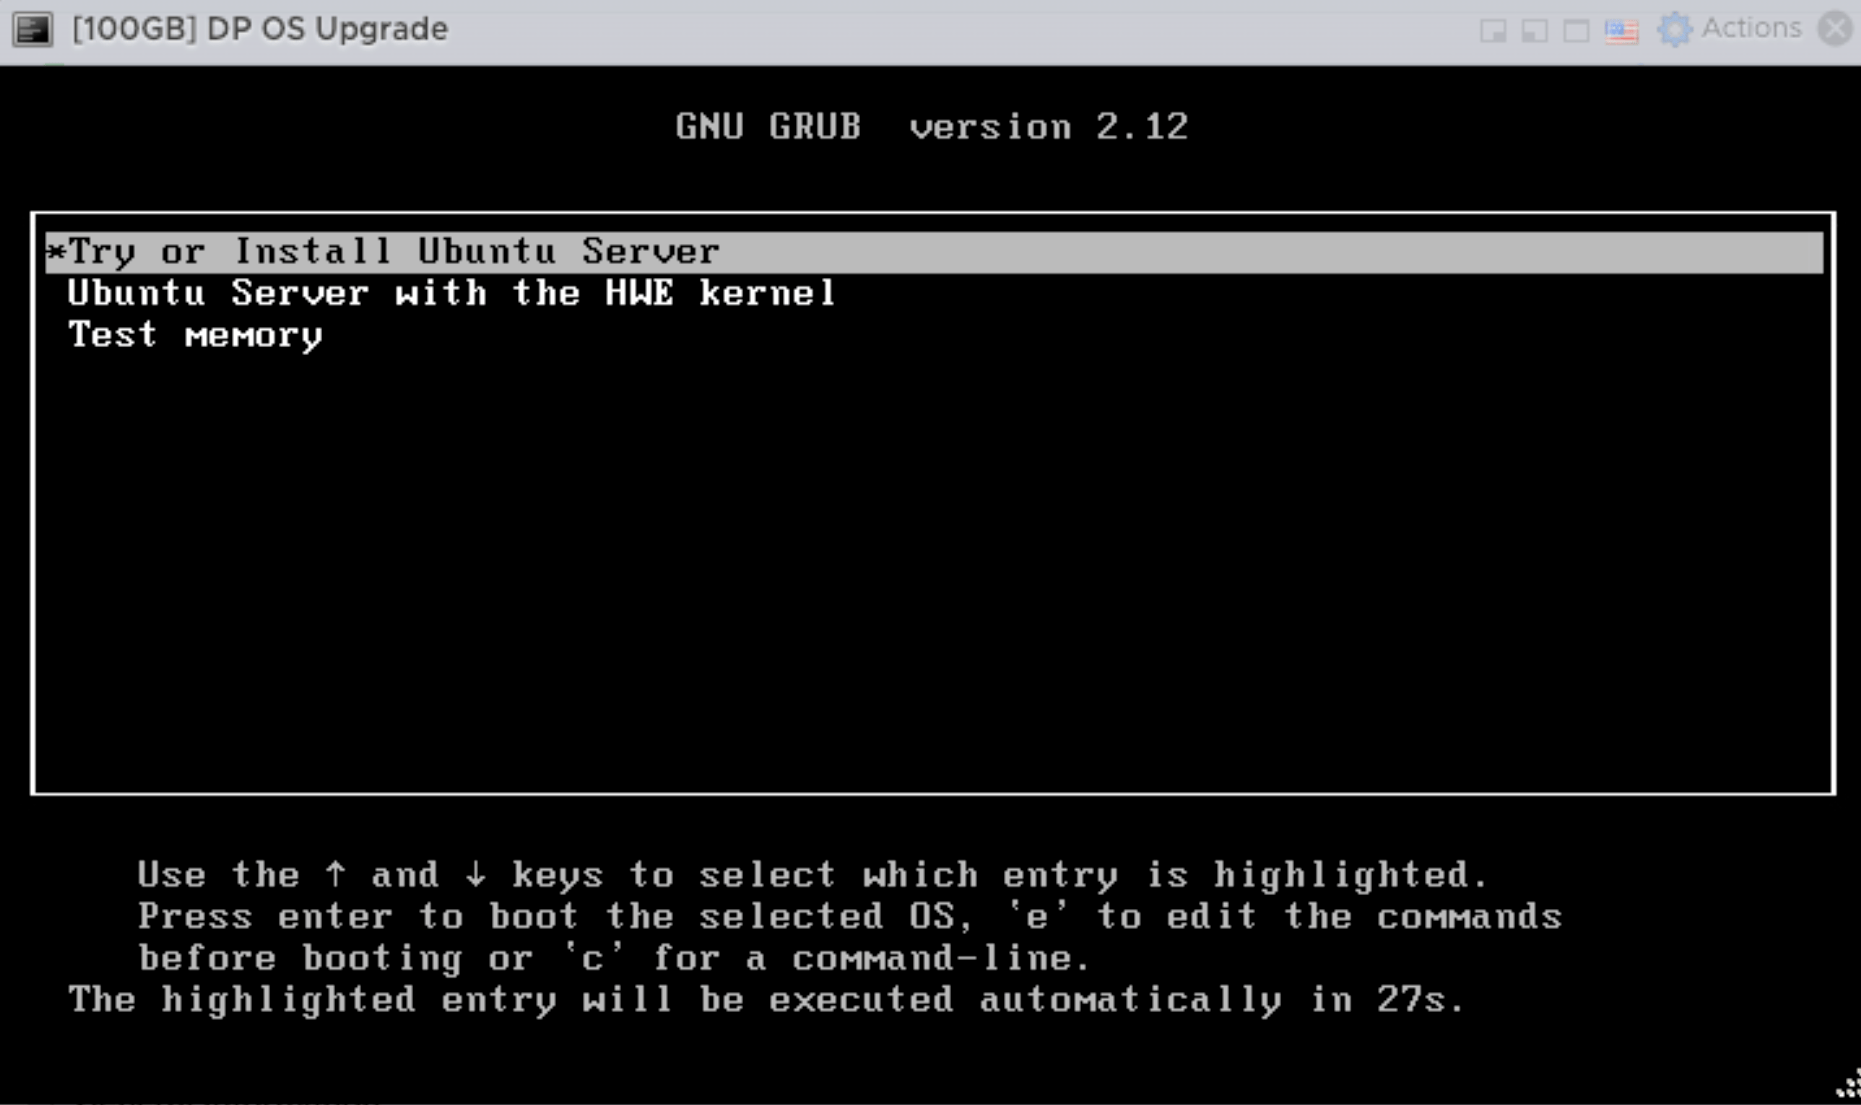
Boot the VM and select **Try or Install Ubuntu Server**.
## Step 2 — Start the Ubuntu Server installer
Boot the VM and select **Try or Install Ubuntu Server**.
 Complete the normal language, keyboard, and network screens for the customer environment.
## Step 3 — Use the full disk and LVM
On **Guided storage configuration**, select the installation disk and LVM.
Complete the normal language, keyboard, and network screens for the customer environment.
## Step 3 — Use the full disk and LVM
On **Guided storage configuration**, select the installation disk and LVM.
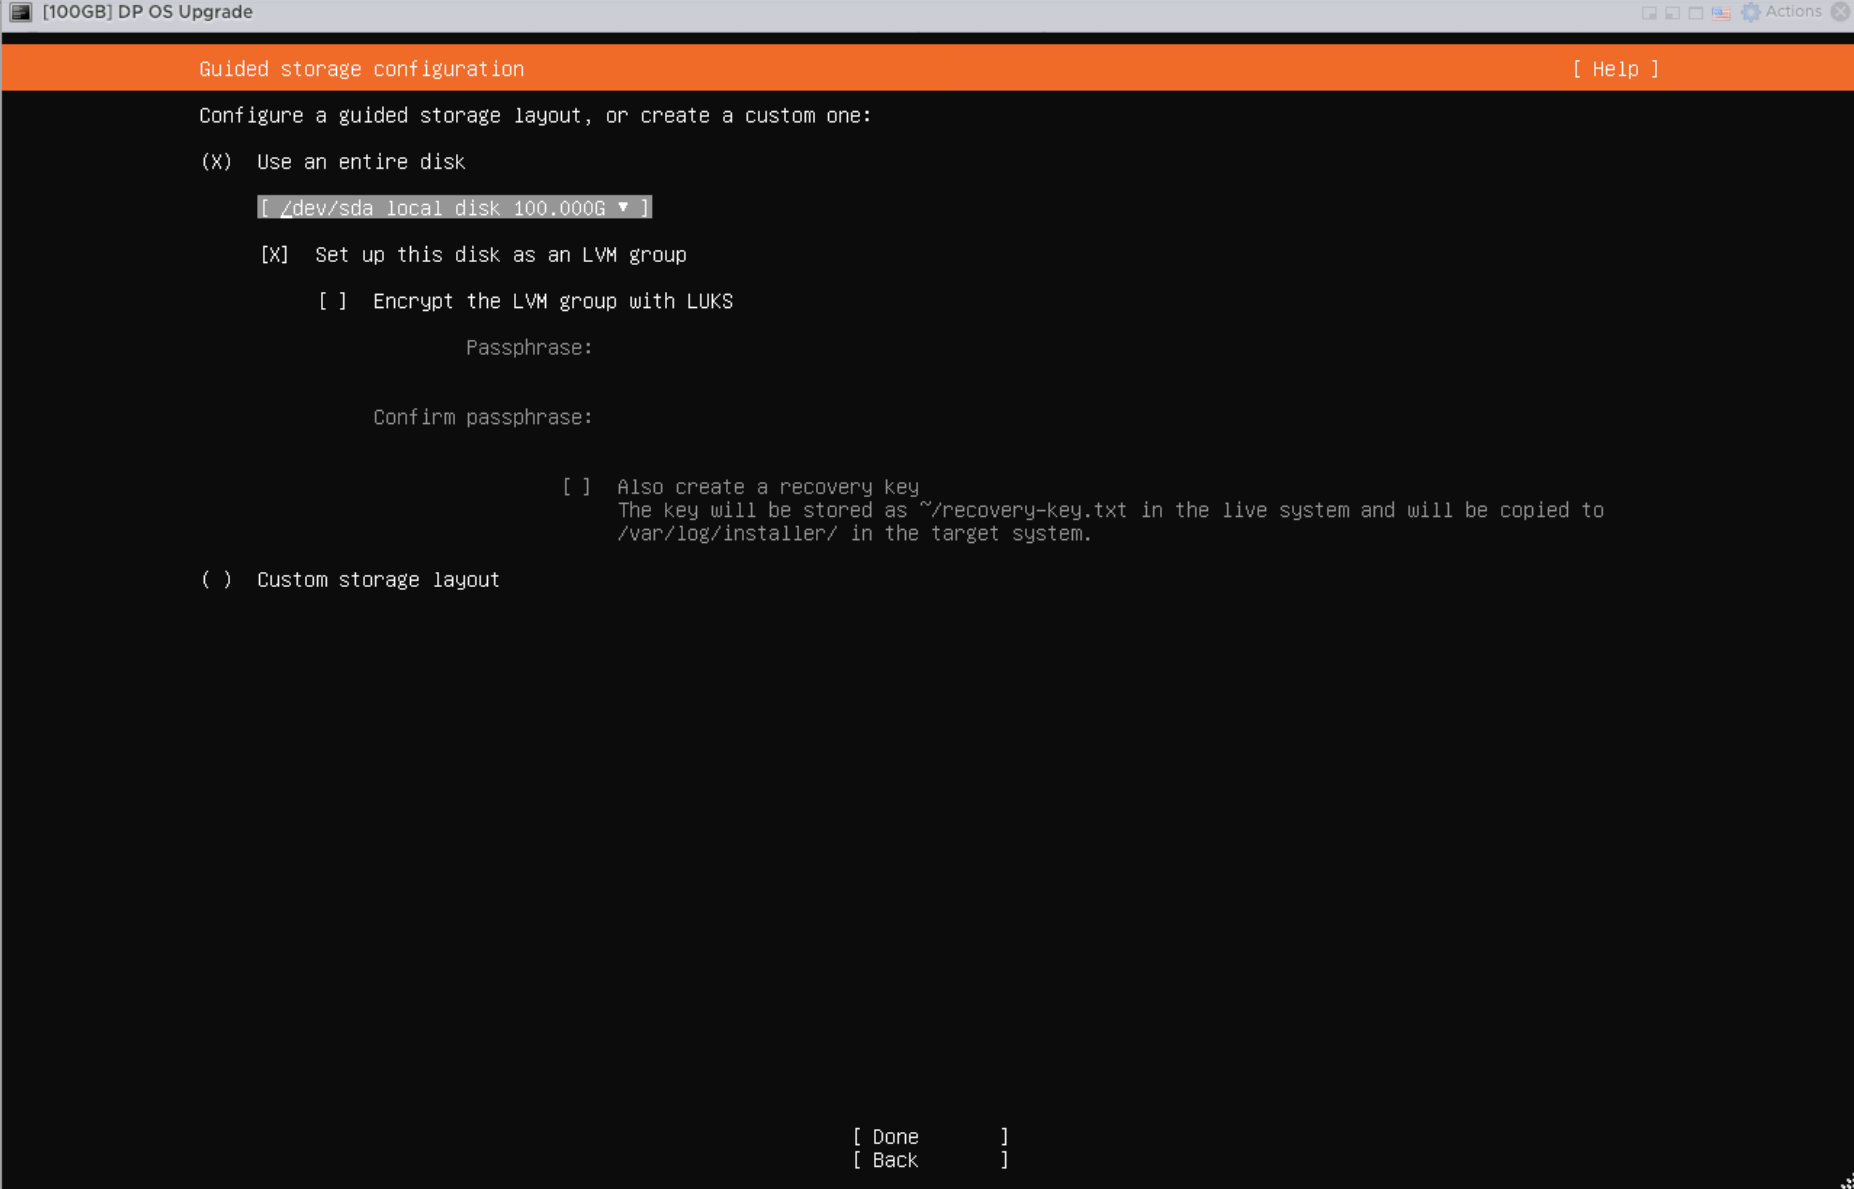 Ubuntu may initially create a root logical volume that uses only part of the available volume group. Do not leave approximately half of a 100 GB disk unused.
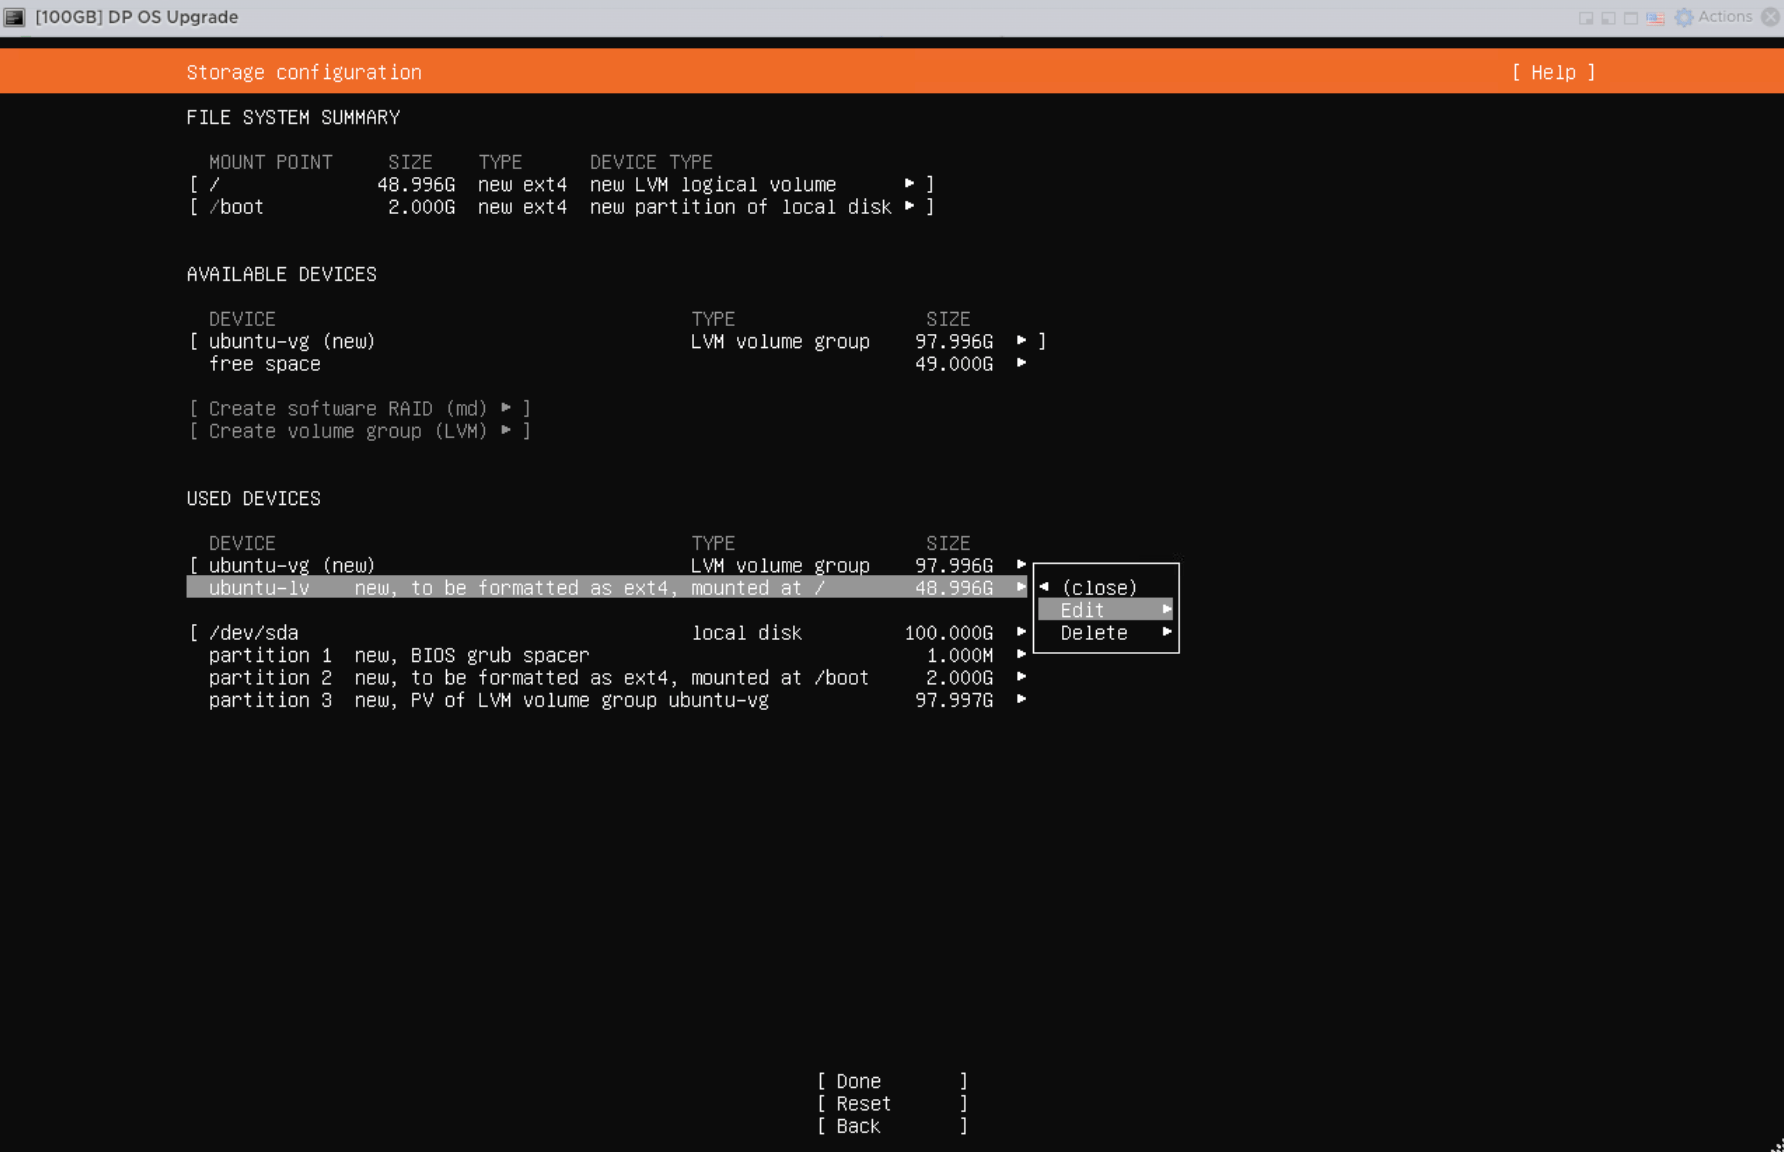 Select the root logical volume, choose **Edit**, and increase it to use almost all available space.
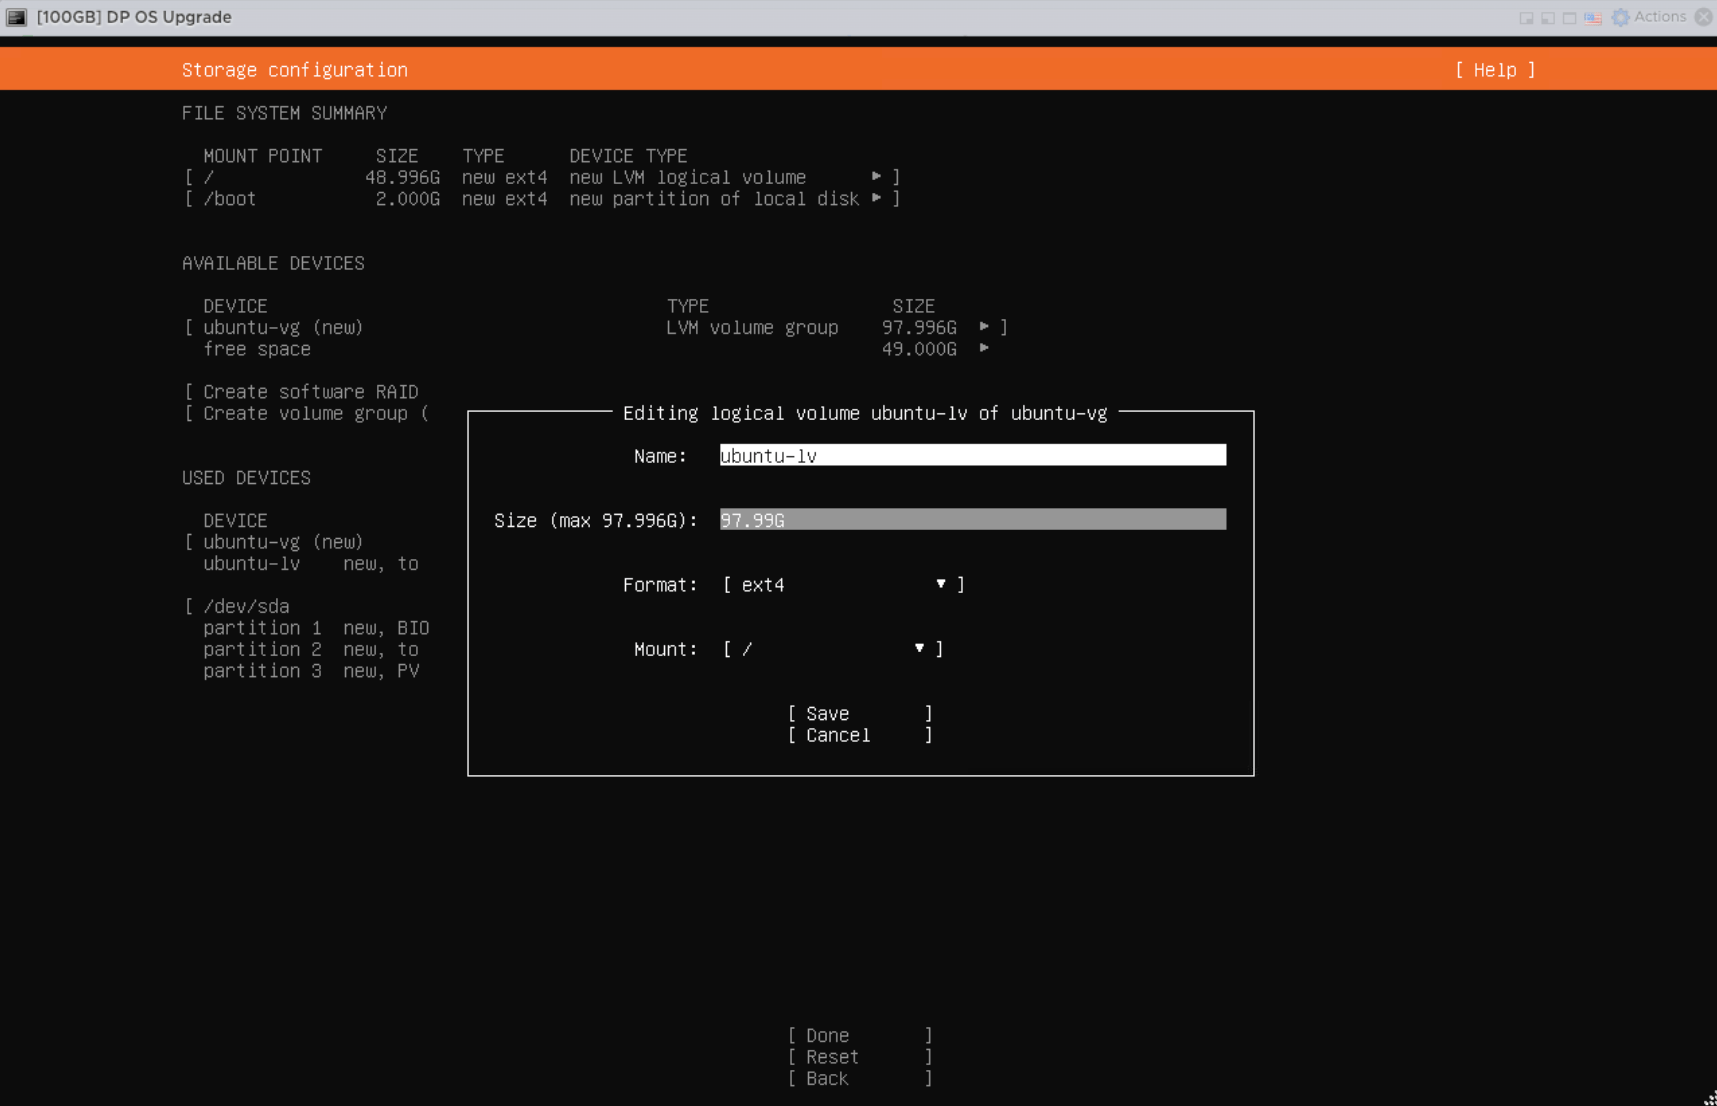 Confirm that the root filesystem now uses the available disk capacity.
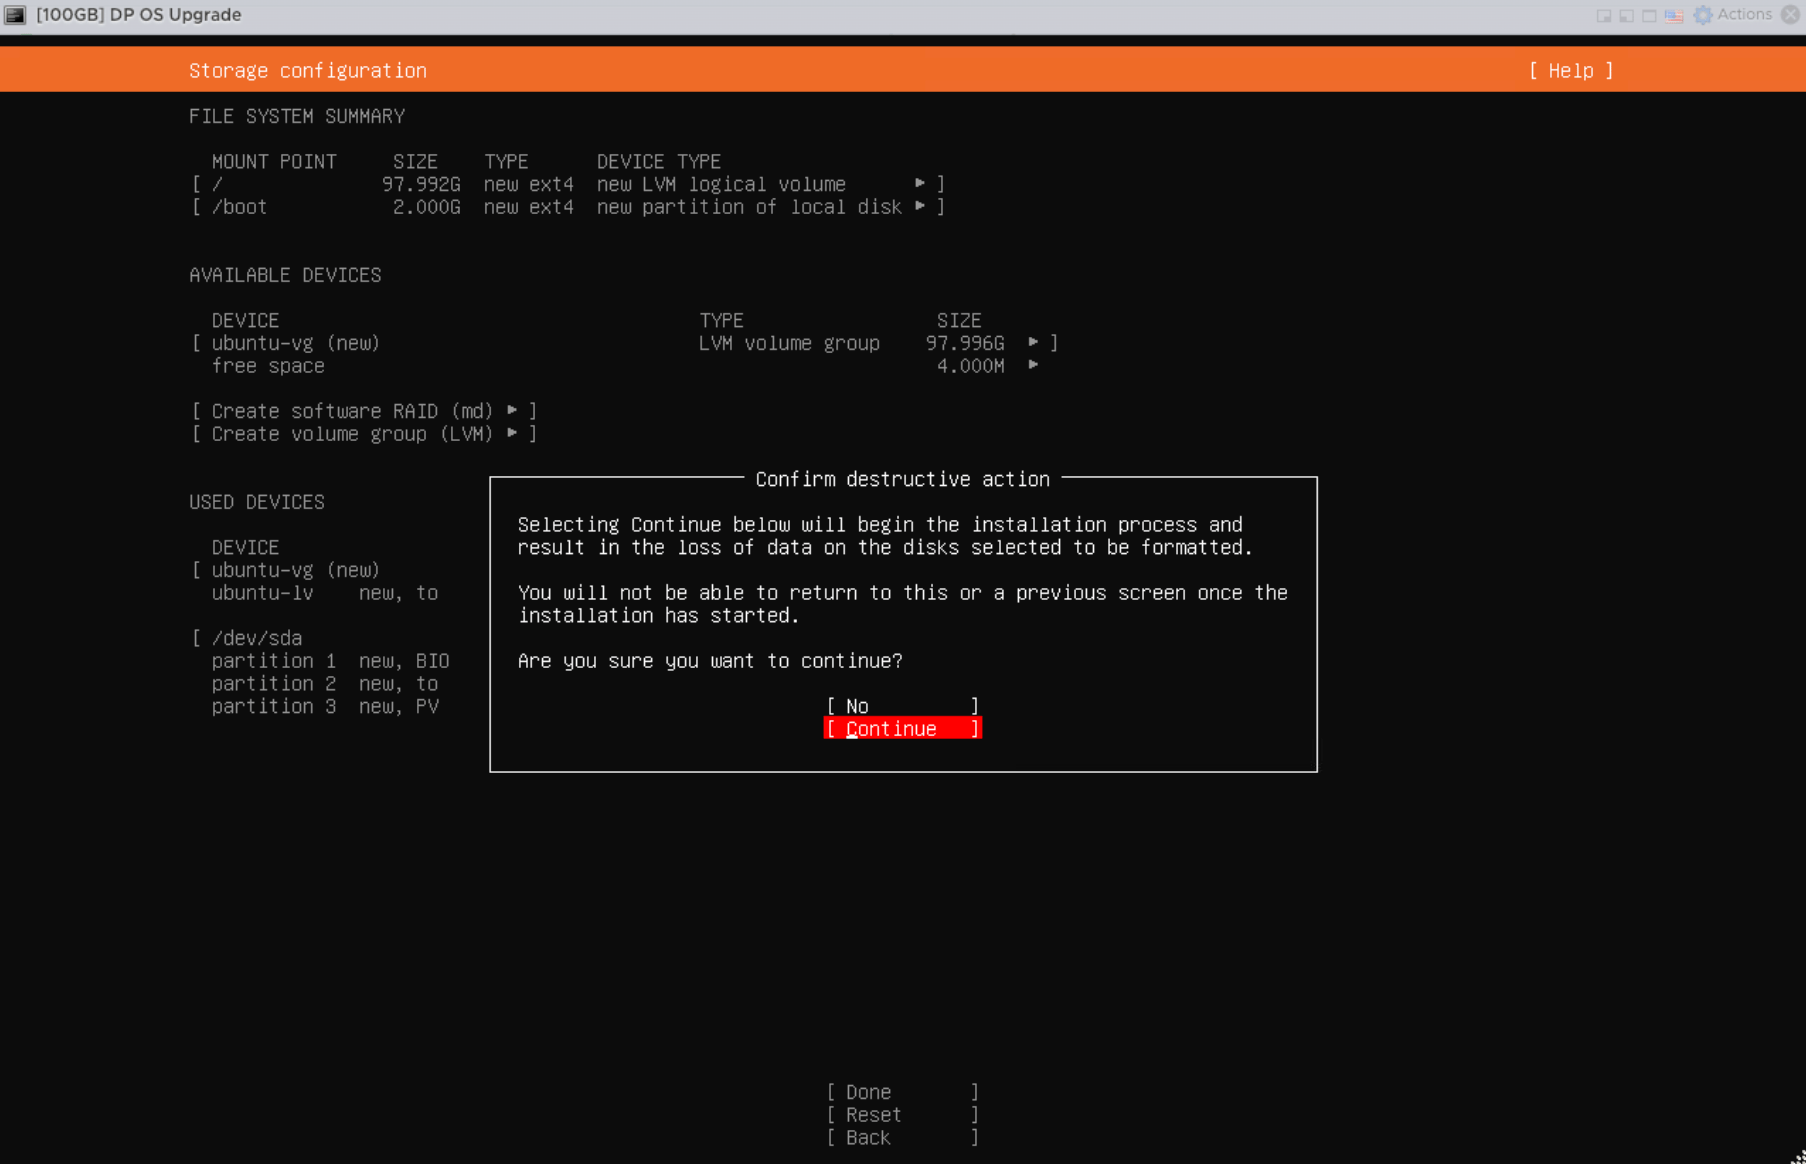
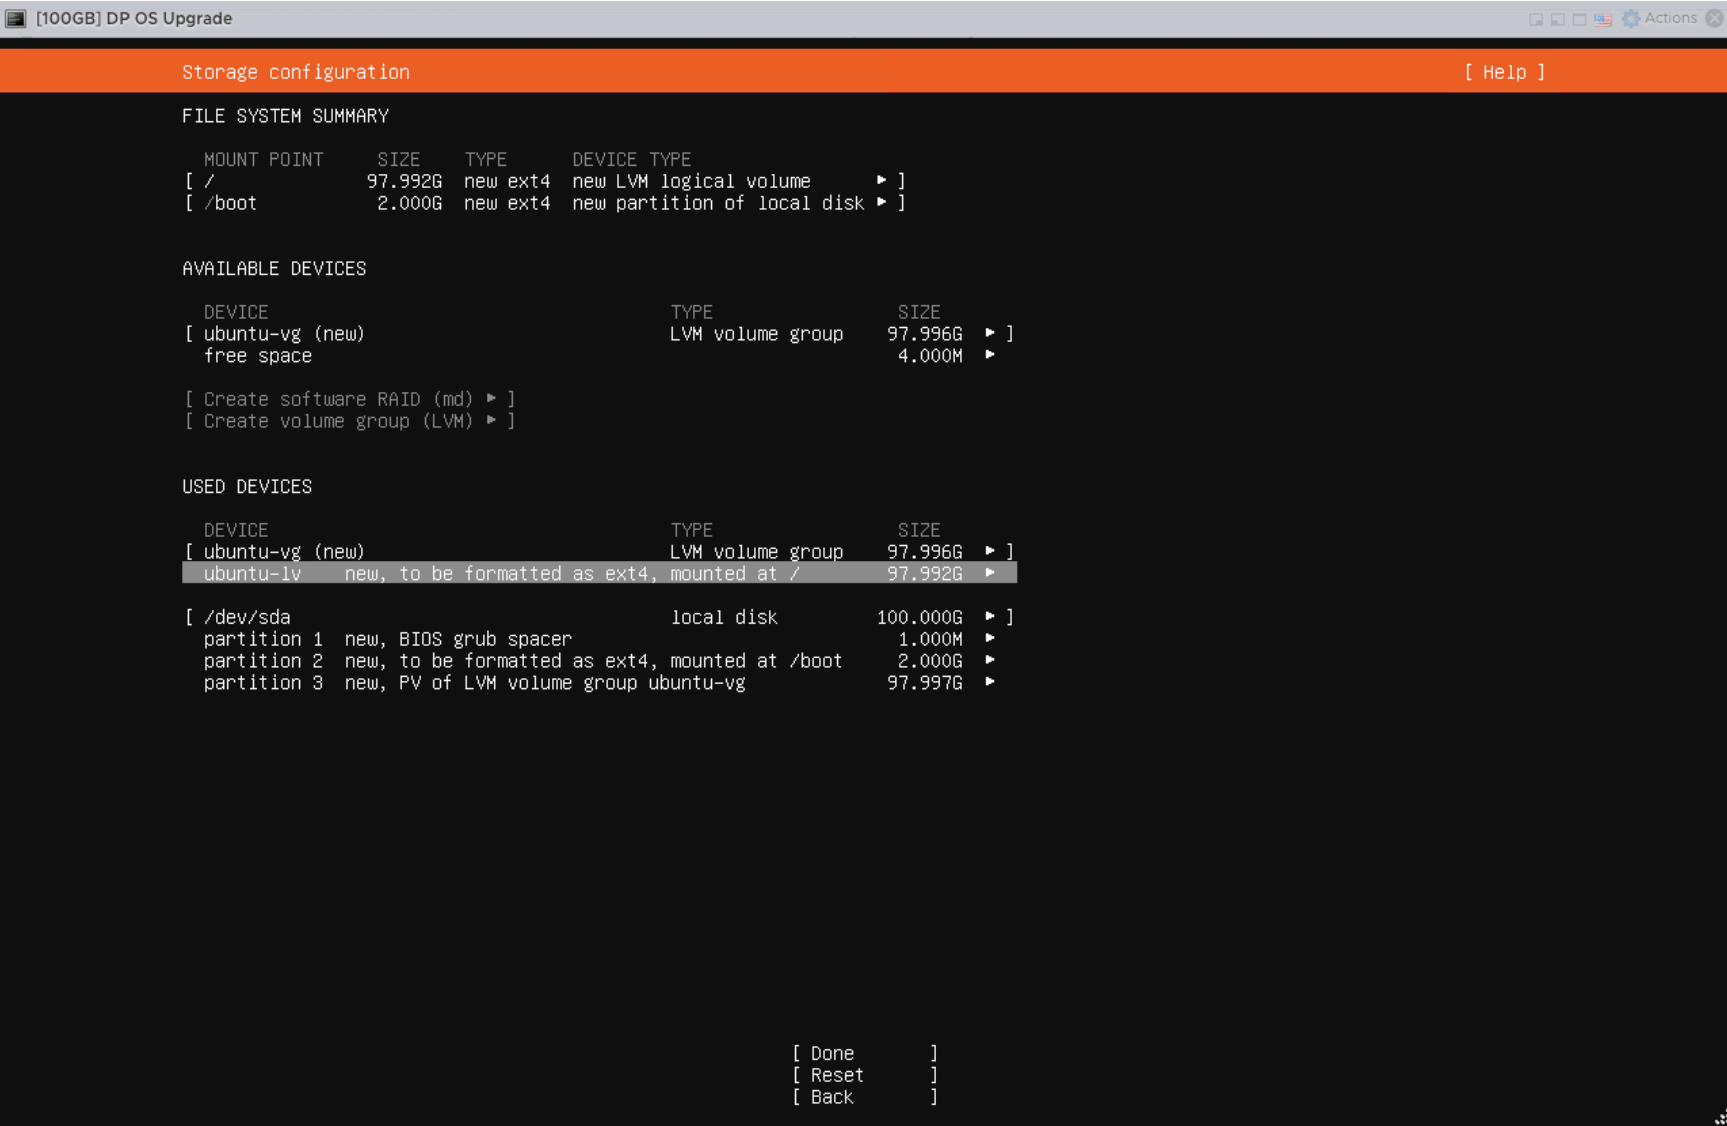 Then select **Done** and confirm the destructive disk action.
 ## Step 4 — Create the administrator account
Create the local administrator account. The screenshots use `aella` as an example.
## Step 4 — Create the administrator account
Create the local administrator account. The screenshots use `aella` as an example.
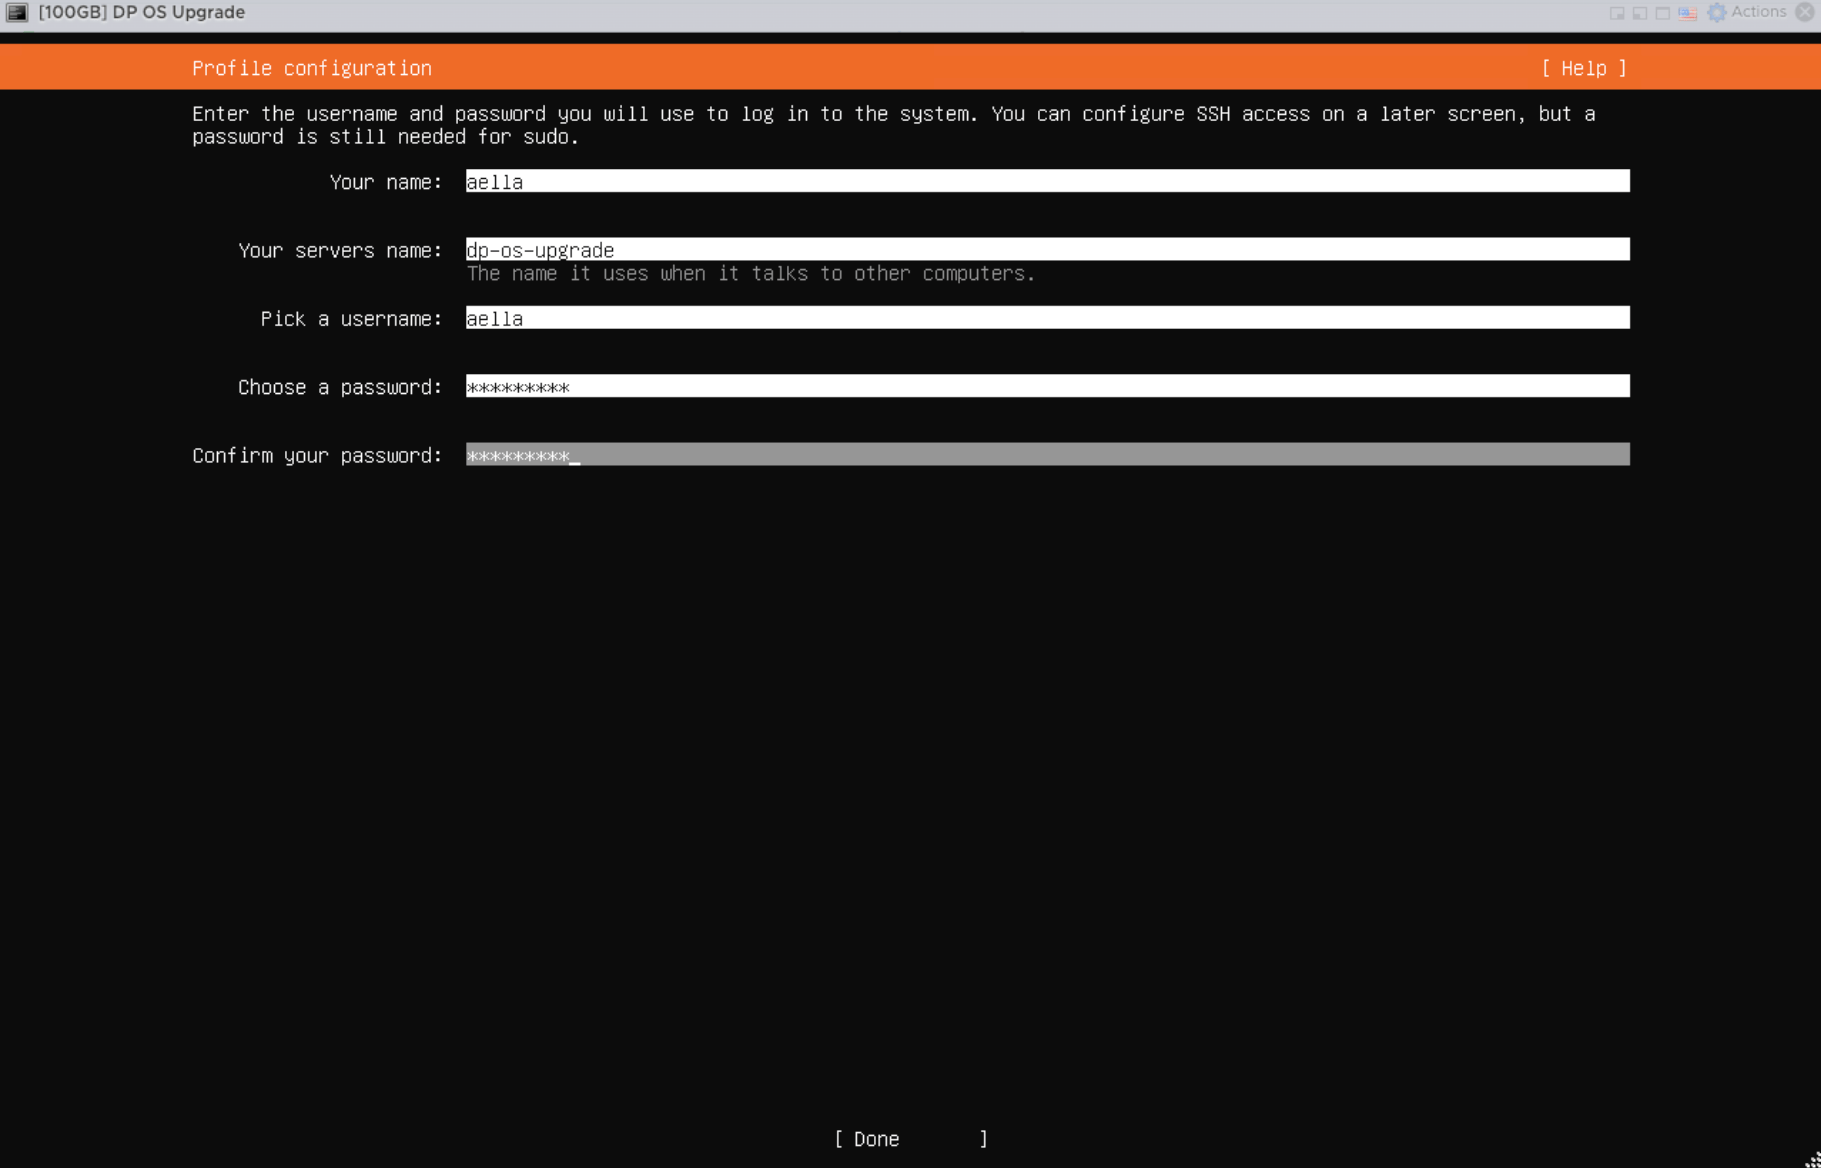 Use the hostname, password, and account policy approved for the deployment. Do not copy example passwords from documentation.
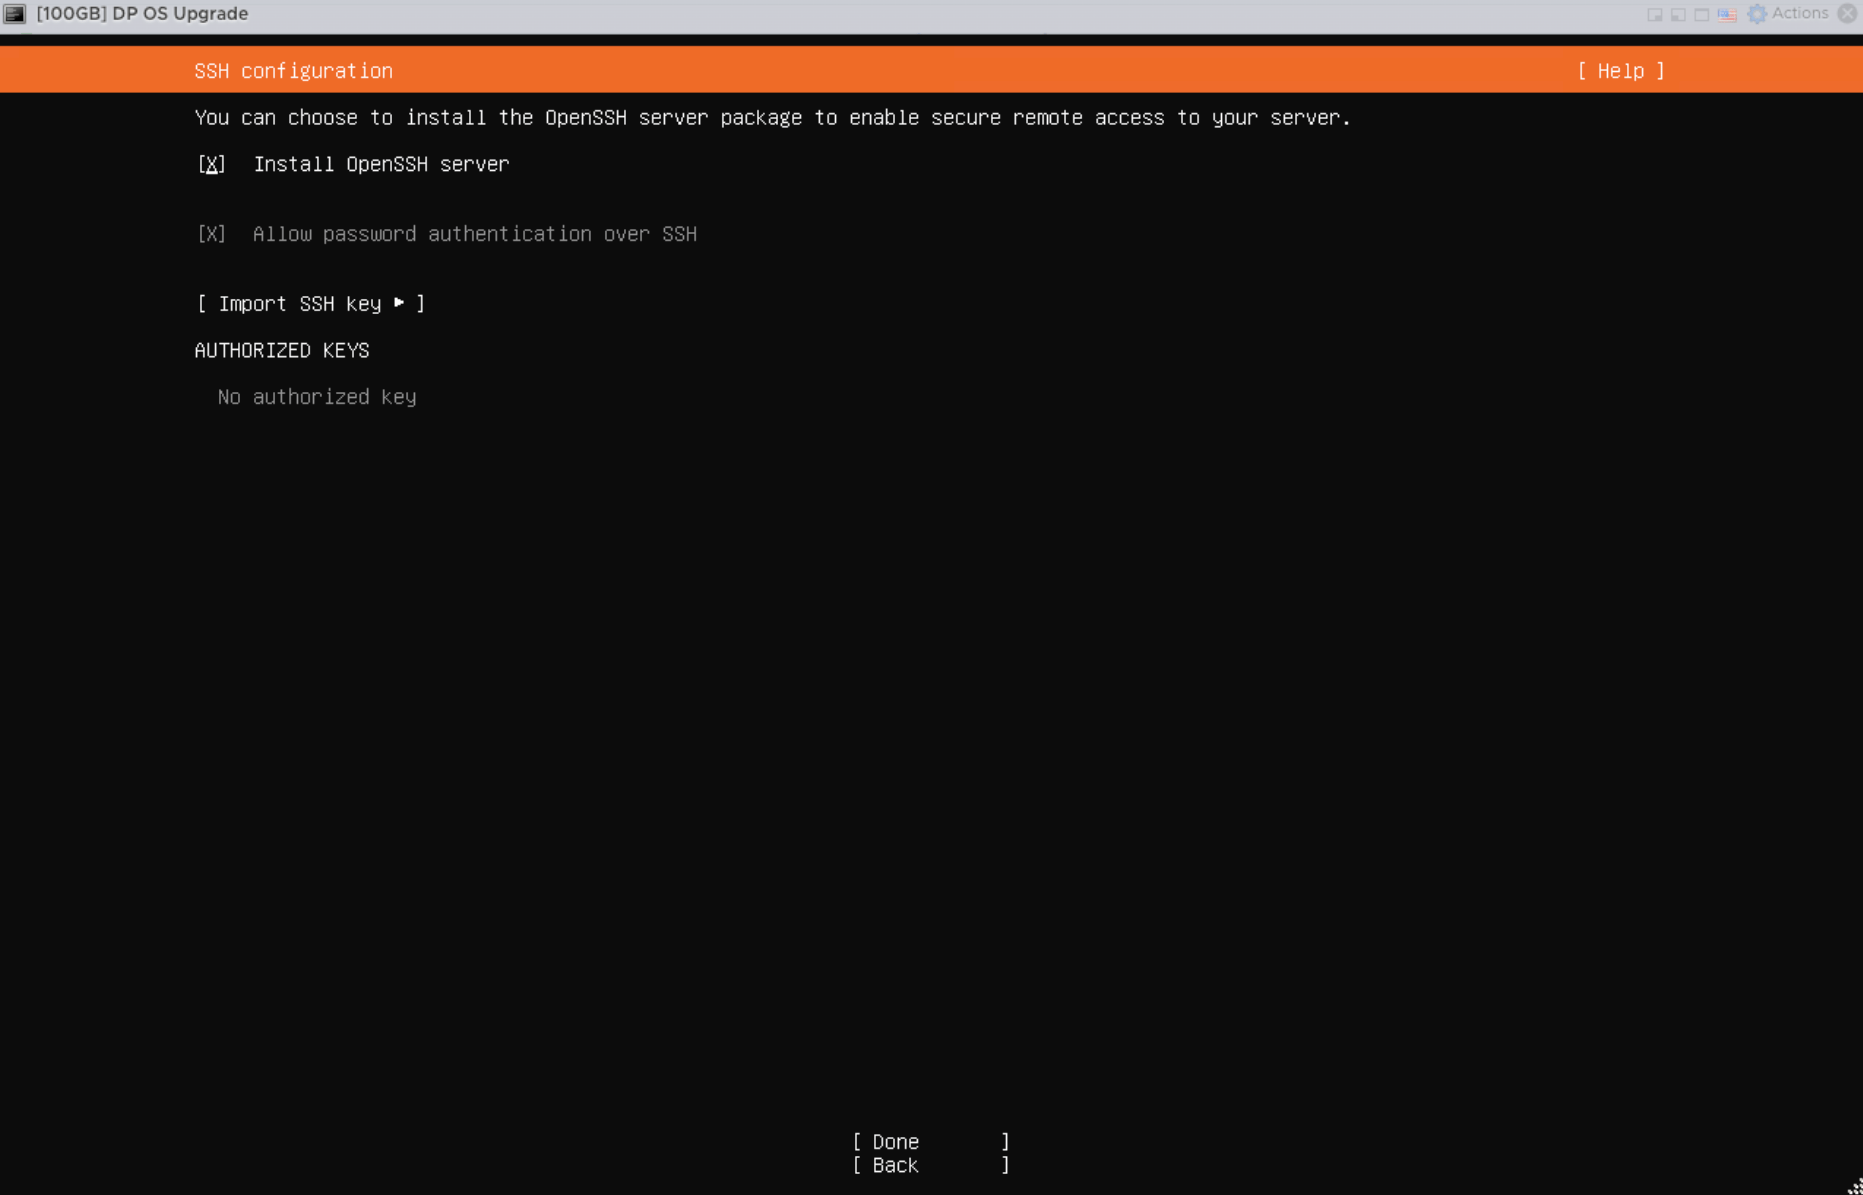
## Step 5 — Install OpenSSH Server
Select **Install OpenSSH server** so the server can be managed remotely after installation.
Use the hostname, password, and account policy approved for the deployment. Do not copy example passwords from documentation.
## Step 5 — Install OpenSSH Server
Select **Install OpenSSH server** so the server can be managed remotely after installation.
 ## Step 6 — Reboot after installation
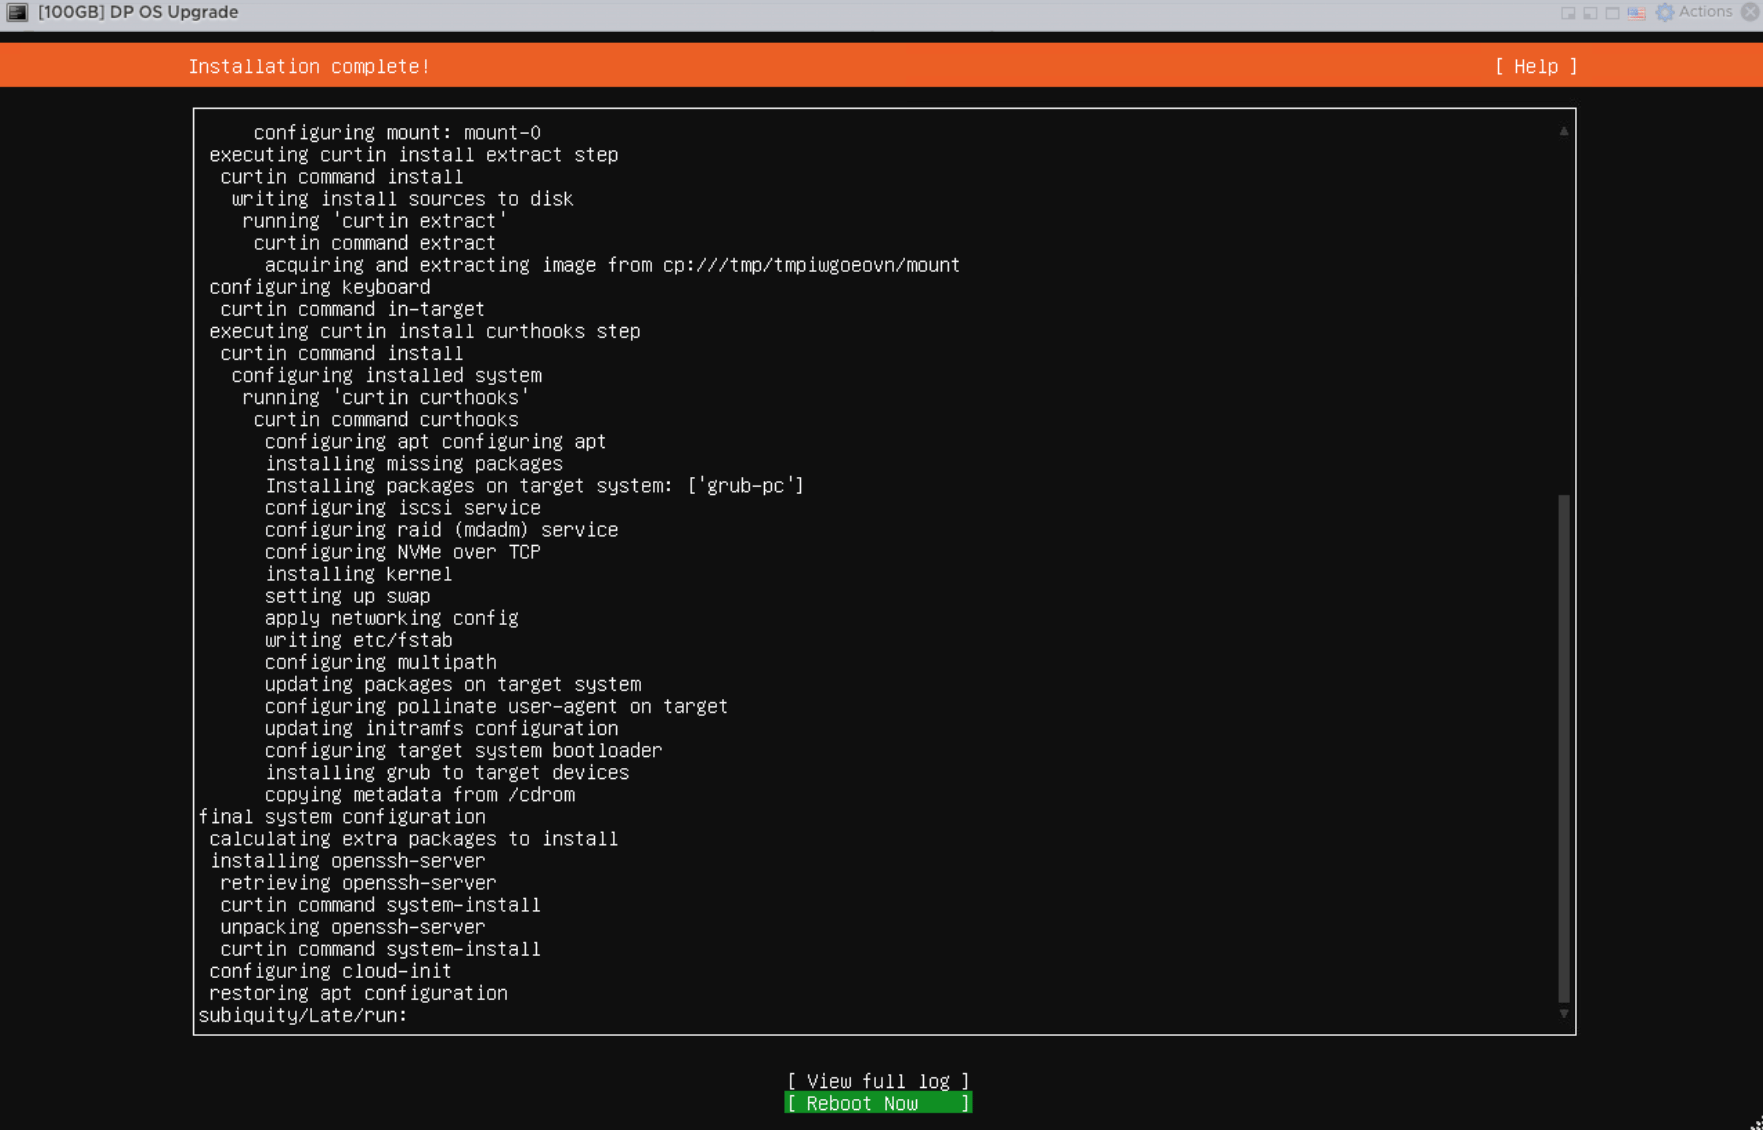
When installation completes, select **Reboot Now** and remove/detach the installation ISO if the hypervisor requires it.
## Step 6 — Reboot after installation
When installation completes, select **Reboot Now** and remove/detach the installation ISO if the hypervisor requires it.
 ## Step 7 — Verify the installed server
After reboot, log in and run:
```bash theme={null}
cat /etc/os-release
df -h /
ip -br addr
sudo systemctl status ssh --no-pager
```
Confirm:
* Ubuntu reports **24.04**
* the root filesystem has the expected capacity and enough free space
* the intended IPv4 address is active
* SSH is active
* the IP address is stable and reachable from the target DP network
## Step 8 — Configure SSH client keepalive
Long preparation and upgrade operations can leave an SSH terminal idle for extended periods. Configure keepalive on the **SSH client used to connect to the Mirror Server and DP hosts** so an intermediate firewall, NAT device, or idle-session policy is less likely to drop the session.
For OpenSSH, add a host-specific entry to the operator workstation's `~/.ssh/config`:
```sshconfig theme={null}
Host
ServerAliveInterval 60
ServerAliveCountMax 5
```
Or use the equivalent options for a one-time connection:
```bash theme={null}
ssh -o ServerAliveInterval=60 -o ServerAliveCountMax=5 @
```
SSH keepalive helps with idle-session timeouts. It does **not** prevent the expected disconnect when a DP reboots during an Ubuntu release hop. After an expected reboot, reconnect and continue from the next instruction printed by the current upgrade procedure.
## Network note
During preparation, the Mirror Server needs outbound HTTPS access to the current GitHub, Cloudflare R2, ACPS, and Ubuntu bootstrap destinations. During the DP upgrade, target DP hosts retrieve prepared material from the Mirror Server over **HTTP/TCP 80**.
## Next step
Continue with **[3. Mirror Server Setup](/runbook/mirror-server-setup)**.
## Step 7 — Verify the installed server
After reboot, log in and run:
```bash theme={null}
cat /etc/os-release
df -h /
ip -br addr
sudo systemctl status ssh --no-pager
```
Confirm:
* Ubuntu reports **24.04**
* the root filesystem has the expected capacity and enough free space
* the intended IPv4 address is active
* SSH is active
* the IP address is stable and reachable from the target DP network
## Step 8 — Configure SSH client keepalive
Long preparation and upgrade operations can leave an SSH terminal idle for extended periods. Configure keepalive on the **SSH client used to connect to the Mirror Server and DP hosts** so an intermediate firewall, NAT device, or idle-session policy is less likely to drop the session.
For OpenSSH, add a host-specific entry to the operator workstation's `~/.ssh/config`:
```sshconfig theme={null}
Host
ServerAliveInterval 60
ServerAliveCountMax 5
```
Or use the equivalent options for a one-time connection:
```bash theme={null}
ssh -o ServerAliveInterval=60 -o ServerAliveCountMax=5 @
```
SSH keepalive helps with idle-session timeouts. It does **not** prevent the expected disconnect when a DP reboots during an Ubuntu release hop. After an expected reboot, reconnect and continue from the next instruction printed by the current upgrade procedure.
## Network note
During preparation, the Mirror Server needs outbound HTTPS access to the current GitHub, Cloudflare R2, ACPS, and Ubuntu bootstrap destinations. During the DP upgrade, target DP hosts retrieve prepared material from the Mirror Server over **HTTP/TCP 80**.
## Next step
Continue with **[3. Mirror Server Setup](/runbook/mirror-server-setup)**.