> ## Documentation Index
> Fetch the complete documentation index at: https://dpos.xdr.ooo/llms.txt
> Use this file to discover all available pages before exploring further.
# 3. Mirror Server 설치 및 준비
> Mirror Manager를 설치하고 업그레이드 파일을 준비한 뒤 HTTP로 배포하여 Upgrade Readiness PASS 상태까지 완료합니다.
# 3. Mirror Server 설치 및 준비
가능하면 **DP Maintenance Window 시작 전에 이 페이지의 작업을 모두 완료**하십시오. 목표는 간단합니다. DP를 작업하기 전에 Mirror Server가 **Upgrade Readiness = PASS**를 표시하고 최신 DP Client 명령을 생성해야 합니다.
## 시작 전 확인
Mirror Server가 다음 조건을 만족하는지 확인합니다.
* Ubuntu 24.04 LTS amd64 실행
* 현재 Artifact 기준 최소 100 GB 총 Disk
* 모든 대상 DP에서 접근 가능한 고정 IPv4
* GitHub, Cloudflare R2, ACPS 및 Ubuntu Bootstrap Package에 필요한 Outbound 통신
* ACPS Credential 준비
* Cluster 구성인 경우 DL/DA Worker IP와 공통 `aella` Worker Password 준비
## Step 1 — Mirror Manager 설치
다음 명령을 실행합니다.
```bash theme={null}
sudo apt-get update
sudo apt-get install -y git
git clone https://github.com/xdr-labs/ubuntu-mirror-automation.git
cd ubuntu-mirror-automation
sudo ./install.sh
```
Interactive Terminal에서는 Installer가 Mirror Manager를 자동으로 실행합니다.
기존 설치를 다시 열려면 다음 명령을 사용합니다.
```bash theme={null}
sudo ubuntu-offline-mirror mirror-manager
```
SSH Session이 끊어졌다는 이유만으로 `install.sh`를 다시 실행하지 마십시오.
> **Screenshot 참고:** 업로드된 과거 Terminal Screenshot 중 하나는 이전 Repository URL을 포함하고 있어 이 문서에서는 사용하지 않습니다. 위의 `xdr-labs/ubuntu-mirror-automation` 명령이 현재 기준입니다.
## Step 2 — 필수 Workflow 이해
Mirror Manager는 한 화면에서 Workflow 상태를 보여줍니다.
```text theme={null}
1 Configuration
2 Download and Prepare Upgrade Files
3 Enable HTTP Distribution
4 Verify Upgrade Readiness
7 Show DP Client Upgrade Commands
```
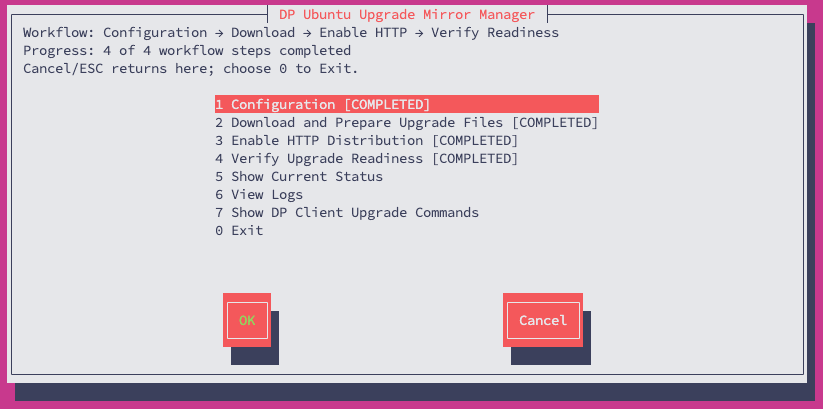 Preparation Workflow가 완료되고 Readiness가 `PASS`가 된 후에만 DP 작업을 시작할 수 있습니다.
## Step 3 — Mirror Server 설정
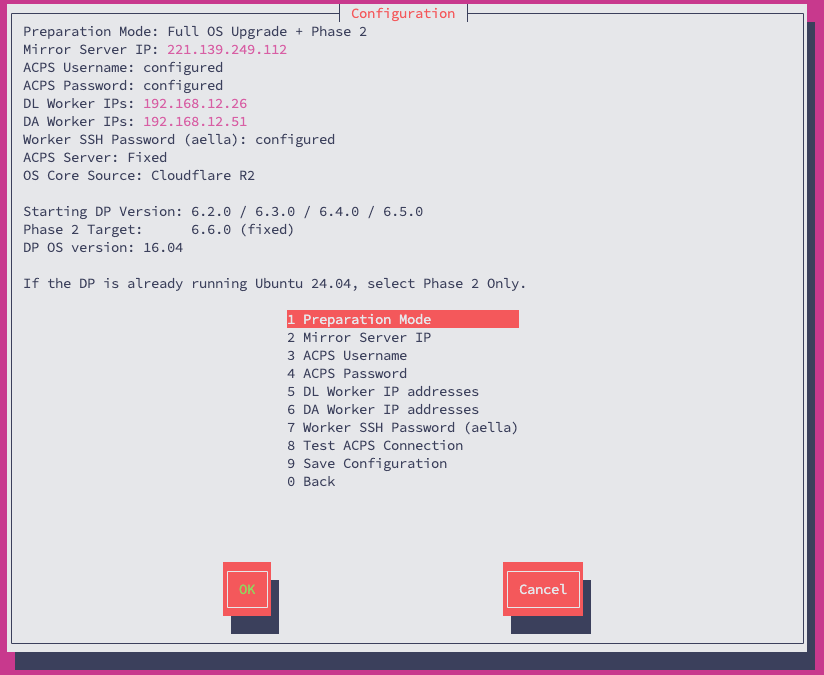
**Menu 1 — Configuration**을 선택합니다.
Preparation Workflow가 완료되고 Readiness가 `PASS`가 된 후에만 DP 작업을 시작할 수 있습니다.
## Step 3 — Mirror Server 설정
**Menu 1 — Configuration**을 선택합니다.
 ### 3.1 Preparation Mode 선택
다음 기준으로 선택합니다.
* DP가 아직 Ubuntu 16.04이면 **Full OS Upgrade + Phase 2**
* 지원되는 DP가 이미 Ubuntu 24.04이면 **Phase 2 Only**
### 3.1 Preparation Mode 선택
다음 기준으로 선택합니다.
* DP가 아직 Ubuntu 16.04이면 **Full OS Upgrade + Phase 2**
* 지원되는 DP가 이미 Ubuntu 24.04이면 **Phase 2 Only**
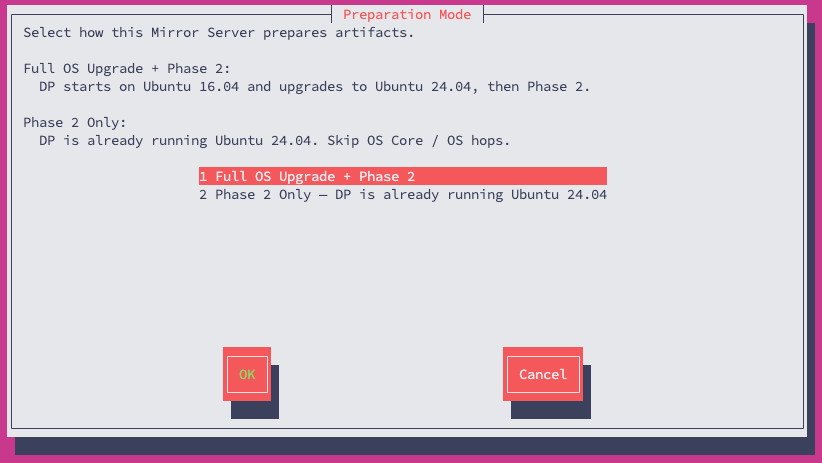 현재 Phase 2 Target은 **DP 6.6.0**입니다.
### 3.2 Mirror Server IP 확인
대상 DP에서 실제로 접근 가능한 IPv4 주소를 입력합니다.
현재 Phase 2 Target은 **DP 6.6.0**입니다.
### 3.2 Mirror Server IP 확인
대상 DP에서 실제로 접근 가능한 IPv4 주소를 입력합니다.
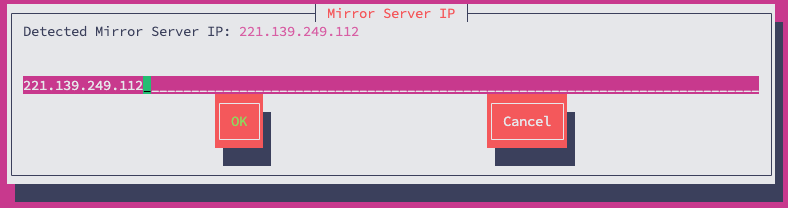 이 IP는 생성되는 DP Client Artifact에 포함됩니다. 이후 IP가 변경되면 Menu 7을 사용하기 전에 Workflow Output을 다시 생성해야 합니다.
### 3.3 ACPS Credential 입력
현재 환경에 사용할 ACPS Username과 Password를 입력합니다.
이 IP는 생성되는 DP Client Artifact에 포함됩니다. 이후 IP가 변경되면 Menu 7을 사용하기 전에 Workflow Output을 다시 생성해야 합니다.
### 3.3 ACPS Credential 입력
현재 환경에 사용할 ACPS Username과 Password를 입력합니다.
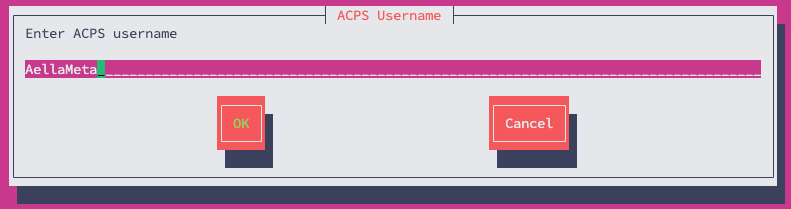
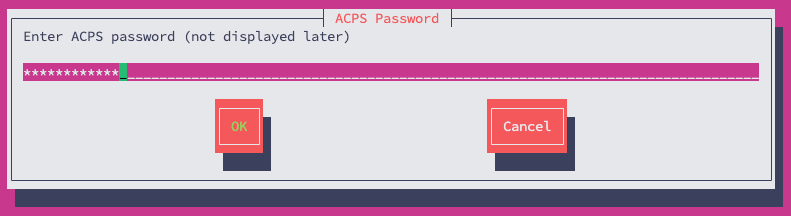 Screenshot은 예시입니다. 현재 환경에 할당된 Credential을 사용하고 Password를 Ticket이나 공개 문서에 노출하지 마십시오.
### 3.4 ACPS 연결 테스트
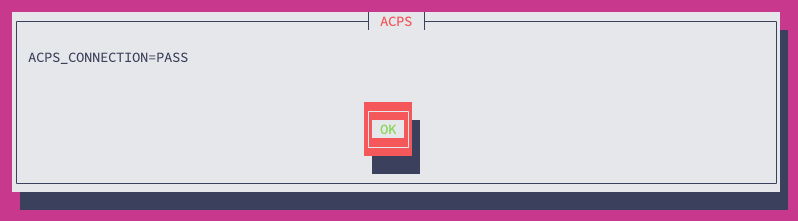
**Test ACPS Connection**을 실행합니다. 정상 결과는 다음과 같습니다.
```text theme={null}
ACPS_CONNECTION=PASS
```
Screenshot은 예시입니다. 현재 환경에 할당된 Credential을 사용하고 Password를 Ticket이나 공개 문서에 노출하지 마십시오.
### 3.4 ACPS 연결 테스트
**Test ACPS Connection**을 실행합니다. 정상 결과는 다음과 같습니다.
```text theme={null}
ACPS_CONNECTION=PASS
```
 ### 3.5 DL/DA Cluster의 Worker 설정
각 Cluster에는 Worker IP만 입력합니다. **Master IP를 Worker List에 포함하지 마십시오.**
### 3.5 DL/DA Cluster의 Worker 설정
각 Cluster에는 Worker IP만 입력합니다. **Master IP를 Worker List에 포함하지 마십시오.**
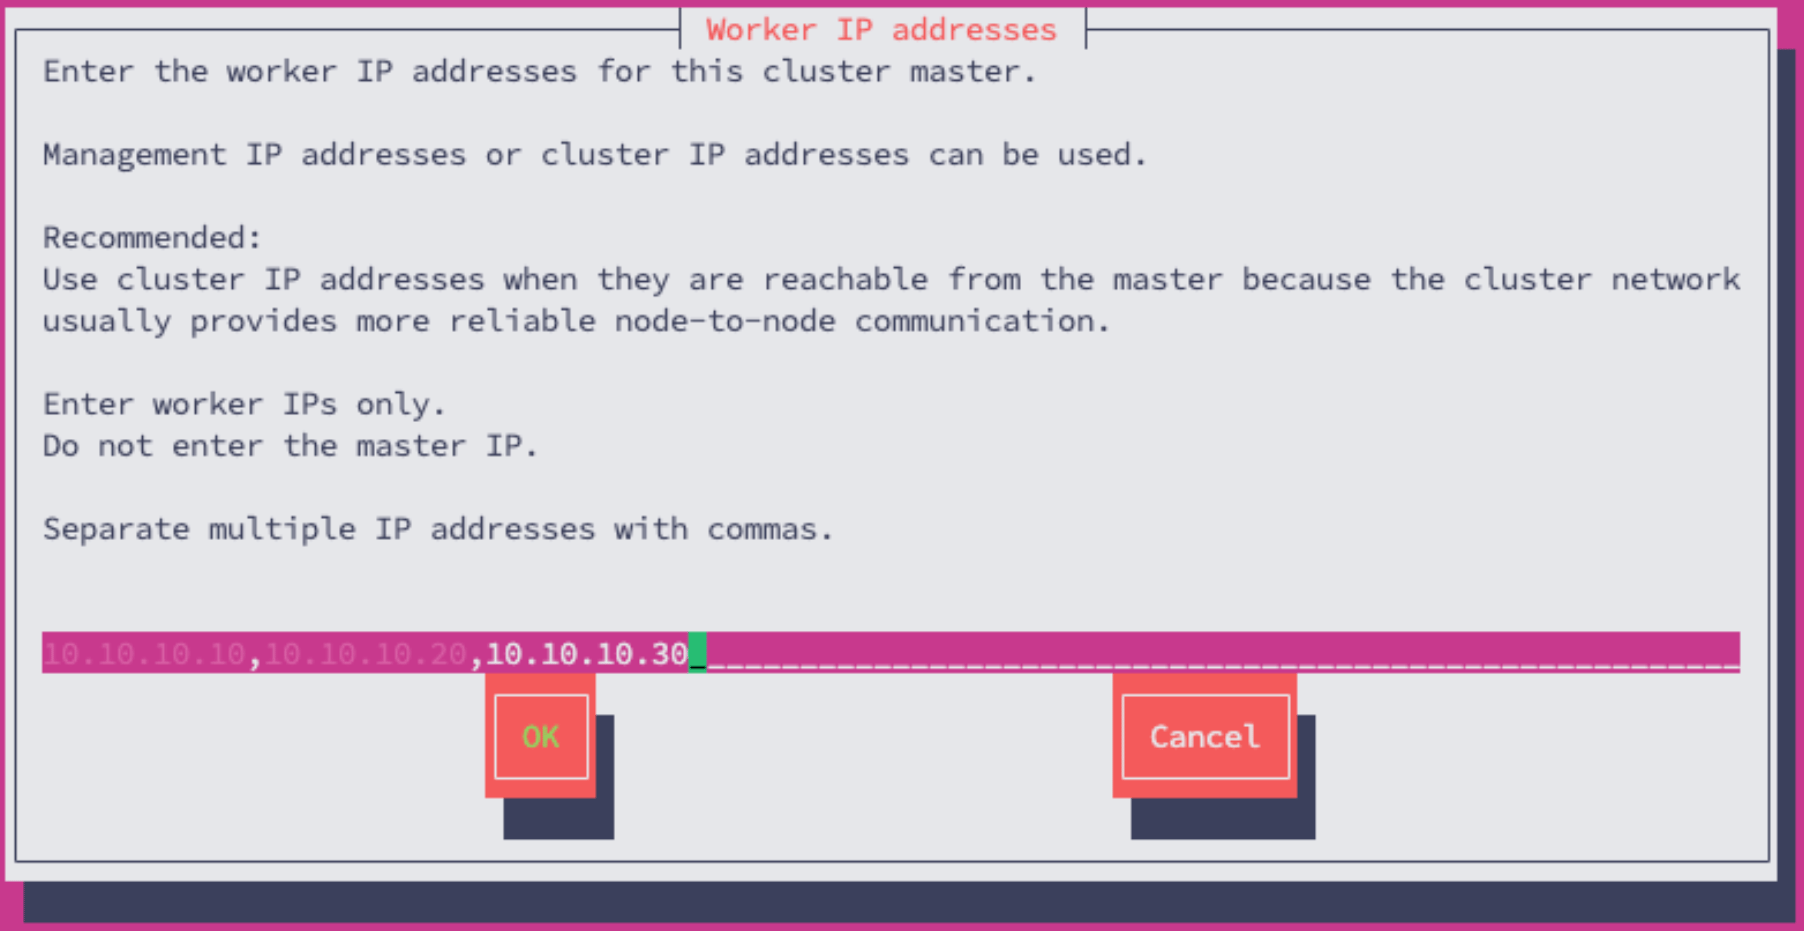 AIO, Single-node, Master-only 구성에서는 Worker List를 비워 둡니다.
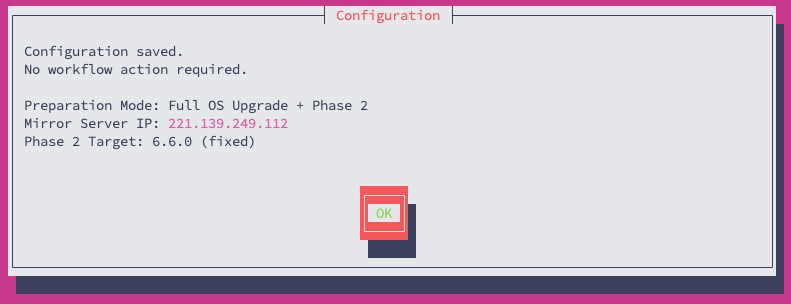
### 3.6 Configuration 저장
Configuration을 저장하고 선택한 Mode, Mirror Server IP, 현재 Target을 확인합니다.
AIO, Single-node, Master-only 구성에서는 Worker List를 비워 둡니다.
### 3.6 Configuration 저장
Configuration을 저장하고 선택한 Mode, Mirror Server IP, 현재 Target을 확인합니다.
 ## Step 4 — Upgrade Files Download 및 Prepare
Main Menu에서 **Menu 2 — Download and Prepare Upgrade Files**를 선택합니다.
## Step 4 — Upgrade Files Download 및 Prepare
Main Menu에서 **Menu 2 — Download and Prepare Upgrade Files**를 선택합니다.
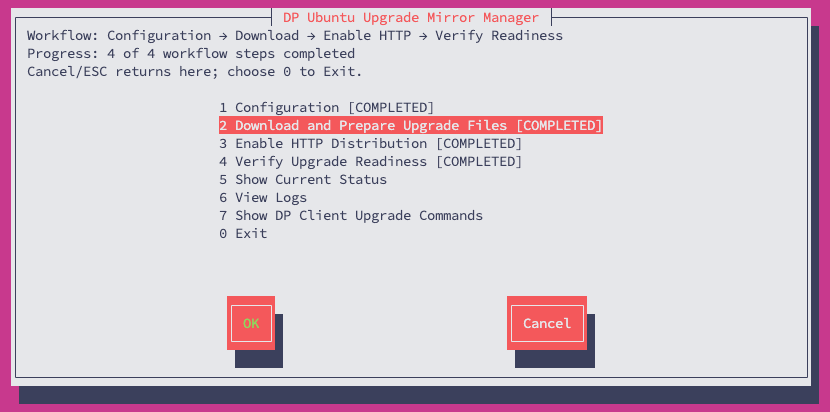 요청된 Preparation 작업을 확인합니다.
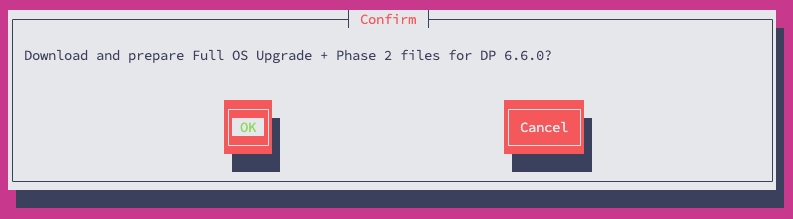 이 단계는 시간이 걸릴 수 있습니다. 대용량 Download, Checksum Validation, Bundle 작업 동안 Progress 또는 Heartbeat Message가 출력됩니다. SSH Session이 끊기면 재설치하지 말고 다시 접속하여 Mirror Manager를 실행하십시오.
현재 Workflow는 이미 검증된 완료 파일과 Partial Download Data를 재사용할 수 있습니다. 강제로 다시 시작하려고 `.part` 파일을 삭제하지 마십시오.
## Step 5 — HTTP Distribution 활성화
Menu 2 완료 후 **Menu 3 — Enable HTTP Distribution**을 선택합니다.
이 단계는 시간이 걸릴 수 있습니다. 대용량 Download, Checksum Validation, Bundle 작업 동안 Progress 또는 Heartbeat Message가 출력됩니다. SSH Session이 끊기면 재설치하지 말고 다시 접속하여 Mirror Manager를 실행하십시오.
현재 Workflow는 이미 검증된 완료 파일과 Partial Download Data를 재사용할 수 있습니다. 강제로 다시 시작하려고 `.part` 파일을 삭제하지 마십시오.
## Step 5 — HTTP Distribution 활성화
Menu 2 완료 후 **Menu 3 — Enable HTTP Distribution**을 선택합니다.
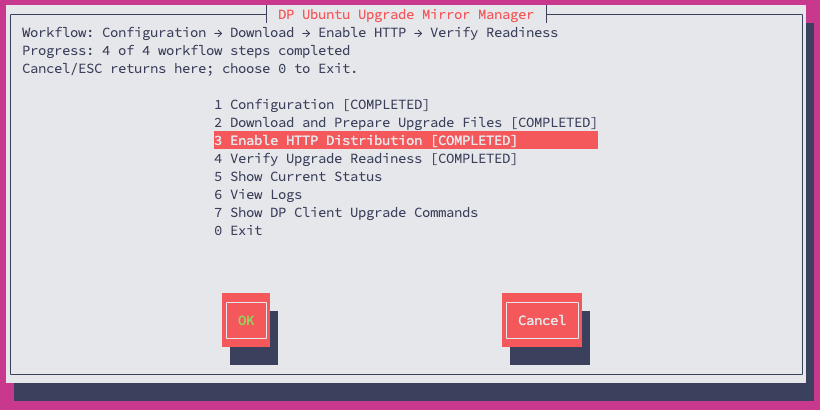 대상 DP는 다음 주소에서 Upgrade Material을 가져옵니다.
```text theme={null}
http://:80
```
## Step 6 — Upgrade Readiness 검증
**Menu 4 — Verify Upgrade Readiness**를 선택합니다.
대상 DP는 다음 주소에서 Upgrade Material을 가져옵니다.
```text theme={null}
http://:80
```
## Step 6 — Upgrade Readiness 검증
**Menu 4 — Verify Upgrade Readiness**를 선택합니다.
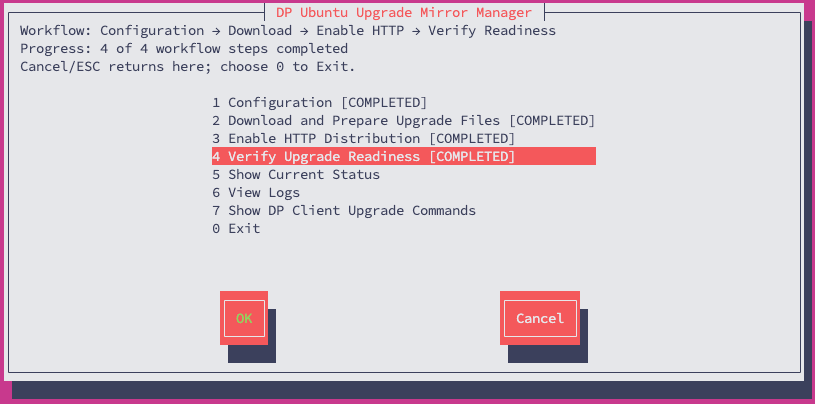 그 다음 **Show Current Status**에서 현재 Workflow가 준비되었는지 확인합니다. 정상 최종 상태에는 다음이 포함됩니다.
```text theme={null}
Configuration: PASS
OS Upgrade Files: READY # Full mode
DP 6.6.0 Bundle: READY
HTTP Distribution: ENABLED
Upgrade Readiness: PASS
Progress: 4 of 4 workflow steps completed
```
그 다음 **Show Current Status**에서 현재 Workflow가 준비되었는지 확인합니다. 정상 최종 상태에는 다음이 포함됩니다.
```text theme={null}
Configuration: PASS
OS Upgrade Files: READY # Full mode
DP 6.6.0 Bundle: READY
HTTP Distribution: ENABLED
Upgrade Readiness: PASS
Progress: 4 of 4 workflow steps completed
```
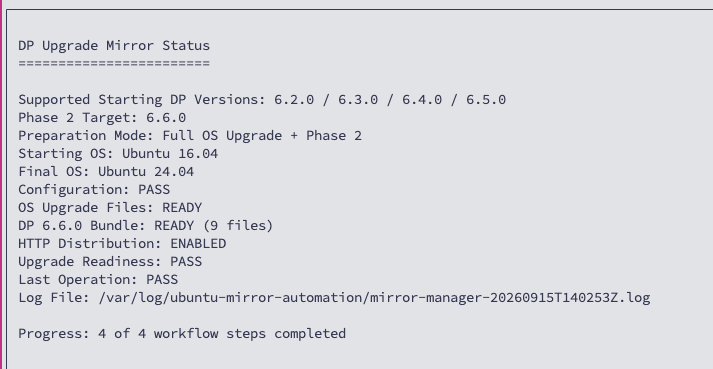 **Upgrade Readiness가 `PASS`가 아니면 DP 업그레이드를 시작하지 마십시오.**
## Step 7 — 최신 DP Client 명령 생성
Readiness가 `PASS`인 경우에만 **Menu 7 — Show DP Client Upgrade Commands**를 실행합니다.
Menu 7은 현재 환경에 맞는 명령의 기준입니다. 출력은 Mirror Server의 다음 파일에도 저장됩니다.
```text theme={null}
/var/log/ubuntu-mirror-automation/dp-client-upgrade-commands.txt
```
Mirror Manager가 이전에 생성된 명령이 Stale 상태라고 표시하면 재사용하지 마십시오.
**Upgrade Readiness가 `PASS`가 아니면 DP 업그레이드를 시작하지 마십시오.**
## Step 7 — 최신 DP Client 명령 생성
Readiness가 `PASS`인 경우에만 **Menu 7 — Show DP Client Upgrade Commands**를 실행합니다.
Menu 7은 현재 환경에 맞는 명령의 기준입니다. 출력은 Mirror Server의 다음 파일에도 저장됩니다.
```text theme={null}
/var/log/ubuntu-mirror-automation/dp-client-upgrade-commands.txt
```
Mirror Manager가 이전에 생성된 명령이 Stale 상태라고 표시하면 재사용하지 마십시오.
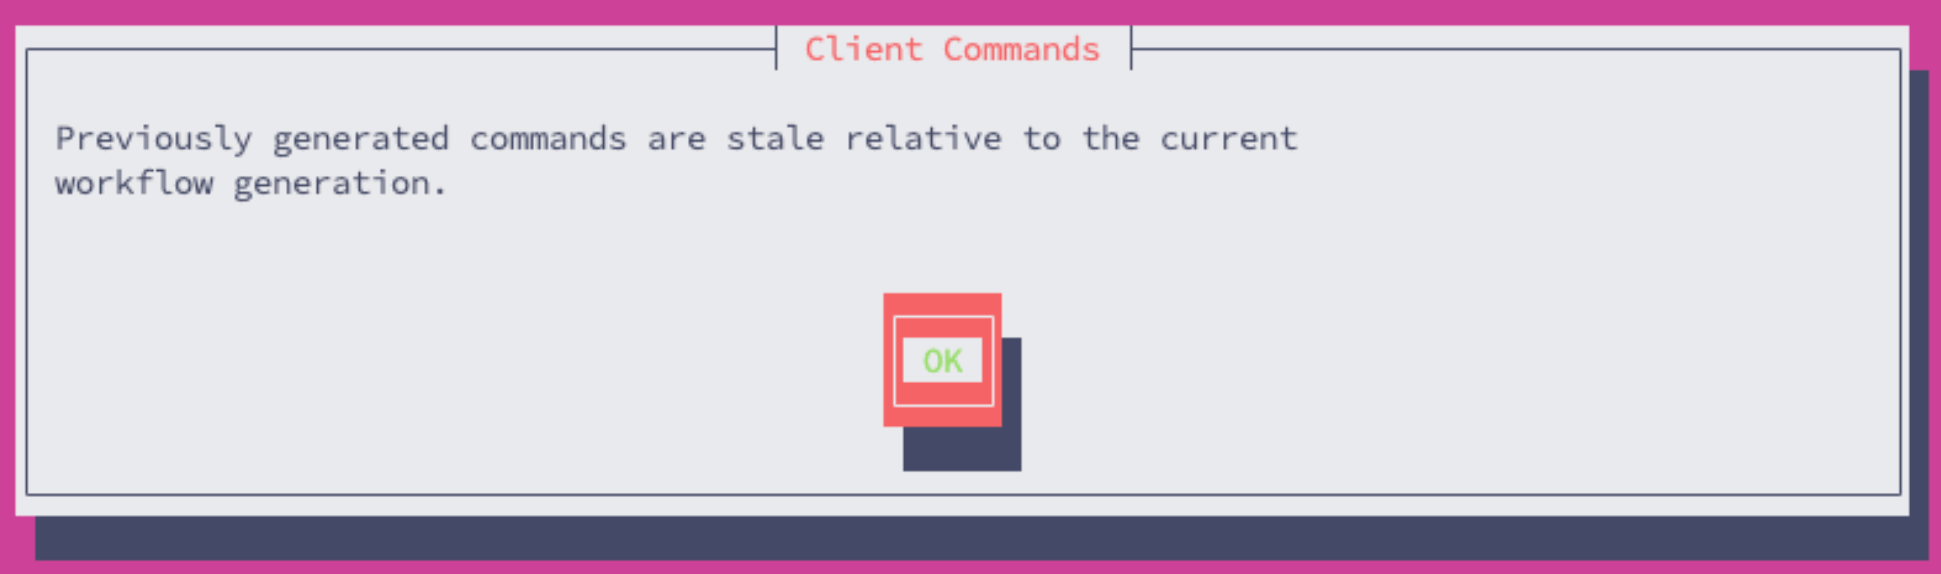 Mirror Server IP 또는 관련 Configuration이 변경된 경우 필요한 Preparation/Publish/Readiness 단계를 다시 수행하고 최신 명령을 생성하십시오.
> **버전 참고:** 업로드된 Screenshot 일부는 이전 6.5.0 개발 단계에서 캡처되었습니다. 이 Runbook에서는 의도적으로 제외했습니다. 현재 문서의 Target은 **DP 6.6.0**입니다.
## 완료 Gate
DP 작업으로 넘어가기 전에 다음 항목을 모두 확인하십시오.
* Configuration 저장 완료
* ACPS Connection Test 성공
* Download and Prepare 완료
* HTTP Distribution 활성화
* Upgrade Readiness = `PASS`
* 현재 Mirror Server IP 기준 최신 Menu 7 명령 생성
## 다음 단계
[**4. DP 오프라인 Ubuntu 업그레이드**](/ko/runbook/offline-dp-upgrade)로 진행하십시오.
Mirror Server IP 또는 관련 Configuration이 변경된 경우 필요한 Preparation/Publish/Readiness 단계를 다시 수행하고 최신 명령을 생성하십시오.
> **버전 참고:** 업로드된 Screenshot 일부는 이전 6.5.0 개발 단계에서 캡처되었습니다. 이 Runbook에서는 의도적으로 제외했습니다. 현재 문서의 Target은 **DP 6.6.0**입니다.
## 완료 Gate
DP 작업으로 넘어가기 전에 다음 항목을 모두 확인하십시오.
* Configuration 저장 완료
* ACPS Connection Test 성공
* Download and Prepare 완료
* HTTP Distribution 활성화
* Upgrade Readiness = `PASS`
* 현재 Mirror Server IP 기준 최신 Menu 7 명령 생성
## 다음 단계
[**4. DP 오프라인 Ubuntu 업그레이드**](/ko/runbook/offline-dp-upgrade)로 진행하십시오.